Wednesday, May 30, 2012


We are getting so close....

so close to maybe being able to say we are actually creating a small farm. Certainly it's very small for a farm that might be able to allow us to make a little money, but it's certainly the biggest garden we've ever had.

Before we moved to Sebastopol we were "farming" on a hilltop in the backyard that literally would produce maybe a handful of yummy edibles at a time. The sun wasn't enough, it could be very cold and windy, and basically we made little raised garden beds by bringing in enough soil to give us maybe a foot of depth if we were lucky. And there was a mole or vole that was hanging out in the raised garden area that would tunnel around and push up our soil (that was only maybe a foot deep). It was more of a hobby garden, but it kept us happy and always wishing we had more; more space, more sun, more soil, more vegetables and more fruits to eat. And we are getting closer and closer to that crazy dream we have.

At least we are finally on the right path and working towards it. We've made more mistakes we'd like to admit these first 6 months or so, but we are learning a lot and with time we won't be making as many amateur mistakes and if we do make mistakes, hopefully they will be at least worthwhile so that we won't do it again. I think most of us out there know that we actually become more knowledgeable about something the more we get to know it inside, out, backwards, forwards, done right and done wrong.

All that being said here's the progress we have made in the last few weeks and I must say we are getting close... getting close to at least having all the seeds and plants in the ground that we had envisioned for at least this first go.

May 20th
day of the annular solar eclipse
planting Turkey Craw seeds into a prepared bed. Turkey Craw is a pole bean so we will have a trellis system in place
planting more tomatoes and peppers. we had to buy in most of our peppers because the slugs kept eating our transplants. we managed to get a handful of seedlings after sowing pepper seeds 2-3 times though. they were small, but  big enough to put in the ground
 
a new potato protection design. Mountain Rose potatoes are planted in here

A bit of a Panoramic shot for May 20th


the shadows and light was odd around the peak time of the eclipse. this photo was around 6:20ish

 May 21st
setting up irrigation and planting some melon seeds


May 25th
sprouting!

German Butterball Potatoes
tomatoes
the "bullseye" in the keyhole block planted with Hopi red lima beans, Hopi black dye sunflowers, a Malabar spinach plant in the center and cilantro around the base

beans sprouting! Painted Pony
remember those beds we were hoeing and scraping back in April? Well we prepared them just enough to throw in some squash seeds and this is what they looked like at the end of the day on the 25th. due to area that we worked and how the blocks and pathways are set up this is what this block is shaping up to look like at this time. basically we are working what will become two separate blocks. right now it's a block and a half.
May 28th
more sprouting and preparing and sowing

first squash seedling! Guatemalan Blue Banana squash germinated first
red radicchio Palla Rossa seedlings with a tiny flea beetle. flea beetles munch upon the cotyledons of the radish seedlings
first melon seedlings!
we decided that I planted the potatoes in my box too close so we dug them up and then put some into a new contraption and also in the squash block where we had a few beds unused. these are La Ratte fingerling potatoes
potaotes just put right into a bed without any cage to keep them safe from the gophers and moles. we will see what happens (maybe it will protect our squash plants if the potatoes keep them busy)
new potato contraption
new potato contraption finished
now the German Butterball potatoes have at least enough room to grow more potatoes. we attached another side layer of wood above the first sides
 Well, for now those are the photos showing the progress. We'll have more soon as we get more work done. 

We are getting close...


Saturday, May 19, 2012

We have to apologize for our lack of posting, but it's not really our fault. You see, we'd love to just keep you updated with words, but it's not nearly as fun as also being able to see photos. Unfortunately our camera finally decided to really die on us so we have not been able to take new pictures. I have procured a camera though by other means and so I have lots of progress shots to share and can explain along the way.

And here we go:

As of late April we were hip deep in a lot of this
vetch, barley, bell bean cover crop
and this is what we were doing a lot of
mowing down cover crop by hand with a Japanese sickle. we didn't have our scythe yet so it was a lot of back breaking work

mowed beds
a partially scraped bed and the scrapings drying in the sun
beds mowed, scraped, drying in the sun and we started to rake away the dried grass
we also spent time building (and rebuilding/turning) our compost pile
 The cover crop and grass scrapings all go into our compost piles. We have made the above compost at least 3 times now (in the photo the first pile in the forefront is being turned into the second pile in the back and we have turned it one more time to make the third pile), but we have so much other stuff to get done that we have decided that we can build as many compost piles as we want at a later date after all the plants are planted and seeds are sown.

 By the time we had our first beds mowed, scraped, and raked we were ready to start preparing our beds with our powdered elements, compost, and dig them in so that we could plant. I won't go into full detail of our bed preparation method here, but I will show you some of our first plantings!

Australian Brown Onions (left 2 rows)! Cipollini Onions (right 2 rows)!
Tomatoes!
 
tomato, pepper, and future melon, cucumber beds in the early morning
Our two methods of planting potatoes. we both had different ideas on what to do, so we decided that we'd try both methods. chris came up the aviary wire cage idea set in the ground (with my added wood base and wood corner additions) and I decided to build somewhat of a box that would get wood sides added as the potatoes grow and we hill the soil around the plants.  

The third Compost Pile
This was the 3rd compost pile on May 13th about 1 week after building it the 3rd time. it breaks down fast and a compost pile should be turned every 3-4 days to keep it hot and doing the job of composting. we don't have the time right now for that, so we have put it on our lower priority list of farm tasks.
 
Remember those beds we hoed and scraped in April? Well, I went back through and re-hoed all the beds so that the grasses would get broken up. They were starting to grow again and we needed to work on them at least one more time. These beds will have our squash plants in them. We have decided to have these beds be 12 foot long by 3 feet wide which we hope will be much more manageable than the 25x4 foot beds we are working with currently.


May 13th on the farm
 This is the space we are currently working with for most of our plantings. In the foreground is our "keyhole block" that will have herbs, sunflowers, some beans in the bulls eye center, carrots and beets on the sides and potatoes in the boxes. There is also the bed of onions and leeks on the right to the block. The block of beds in the midground on the left will have our tomatoes, peppers, cucumbers, melons. The block of beds in the midground on the right will have all of our bush and pole beans and leafy greens. We are calling this our "beans and greens block". Then the grassy area beyond the prepared beds has the squash beds that are hoed and will be mulched.

By May 14th the keyhole block looked like this:

chris preparing the herb portion of the keyhole. I decided to make the center our cardinal directions bed with sunflowers in the 4 corners and beans planted in the middle spaces and then a malabar spinach in the center and cilantro seeds around the base
we prepared and planted the bed in the background of the "beans and greens block" with 4 kinds of greens: giant red mustard, mizuna, red radicchio, and wild arugula


the mizuna was the first to germinate. it germinated in 4 days!
planted American Flag leeks in the onion bed
right now we are hand watering until we have time to put in our irrigation

 Well, that's what we have to share for now. We've been so busy farming it's hard to have time for blogging. We are rushing to get as much done as possible before the daylight starts lessening again. It's nice to have these long daytimes so that we can get up early (yes, even by 6am) and work late into the day (with a siesta midday if we can afford it!)

Thanks for stopping by
C+C


Wednesday, April 11, 2012

Picture Montage! (to show the progress we have made) of making beds and hoein' beds for future squash plants

                    February 19th: See Chris way down in the middle background there? Intended to plant our market crop of beans here. Preparing the beds by scraping and forking up the purple velvet grass and salt grass. The foreground are our beds in cover crop. Nice and green, but some of them were not really growing much of the cover crop. Some beds mostly have the weedy annual grasses coming back.

February 19th: Probably spaded and forked about 1/4 each of 2 beds by this time. Chris likes the spade and I liked the fork.

February 19th: Later in the day we got through what could be 3 beds worth of purple velvet grass and salt grass

April 8th: we got behind on finishing the block and the rains kept the grasses growing. We learned a new technique for preparing beds by using a hoe to re-break up the roots and shaping them and then we will cover them with rice straw mulch which will help the grasses decay and their roots will hopefully not continue to grow back

April 8th: I decided that I really like using the hoe! I do not like using the spading/scraping technique.

April 8th: Compare these 3 beds to the picture of Chris with the 3 beds we worked on in February. Nice, huh?!

April 8th: Mostly "prepared" (just a little strip we didn't complete) before we put the mulch on at a later date
Just an update on a section of the farm. These lower future blocks had been worked 2 years ago by "The Bohemians" (a former group of farming ladies who leased part of the land), but they couldn't get in their rototiller during a wet winter and so they eventually disbanded and then the area was left as you see it in the very first picture with mostly purple velvet grass. We are preparing this area with a mostly fresh start so it's hard work. We will be hoeing and scraping these lower sections and mulching them to allow to roots to die back so that later in the season we can try and grow some winter squash. Winter squash should do well in an area that is prepared in such a way since they grow so easily with minimal effort (ever had a compost pile that sprouts tons of squash seedlings? Yeah, this is kinda a similar circumstance as we will basically be composting the green material under the mulch, so a squash seed should do very well). Originally the plan was to prepare 6 blocks with 8 beds each in this section and grow our cover crop of different varieties of beans to sell as a market crop. This may have been way too ambitious for the first year. Maybe next year. But hopefully our squashes are prolific!

We have gotten behind due to the intermittent rains and my lack of being able to be there more than 1 day a week, but that will be changing now that we are soon to be residents of Sebastopol. We will be only a 2.5 mile drive from the farm! Yeah! looking forward to our country life.

Late night farming (this is our farm mentor, Yeti's, famous garlic beds by bike light)

Tuesday, March 6, 2012

The Art of Seed Storage, Organization and Sowing

Most of our seeds have arrived and we have been starting to organize and plan what we will be sowing into flats and what we will be sowing into pots. The rest will be sown directly into the farm beds.

I've been organizing our seeds similar to how I do it at work at the Redwood Creek Nursery. I bought a bin that has just enough space to store most of the seed we will be buying except for the bulk seed and potatoes. In the bin I have file folders that are labeled by month and then I also have some labeled with letters of the alphabet. Basically the way it's organized is by seed sowing timing for this year and then the seed that will be stored can be filed alphabetically. So for instance, onions and leeks are filed in the February folder, while tomatoes and squash and beans are filed under the May folder. In the front of the bin I have seeds that can be sown at any time of year, like beets and radishes and some leafy greens. I can't say that I came up with this system, but rather I have "borrowed" the idea from work and I have to say it's rather clever. I find that this helps to remind me of what time of year to sow things.
Since this is the first year that we really have a much larger diversity of veggies we are growing, I also have a calender specifically for noting what we sowed and when it was sowed. I am also noting the weather and rain to as it will help me remember exactly what the year was like weatherwise and maybe give some insight into how well things do or don't grow this year. We also have a spreadsheet with a multitude of things we are keeping track of such as  sowing info, we have farm bed schematics, we are tracking what seeds we have bought and from where and how much it cost and well... let's just say a lot of stuff. More than I want to get into in this post (we'll save all those organizational systems for a later date).

For our seed sowing needs I thought I would go a more "wholesome" route when it comes to sowing seeds in flats. I decided that I would build seed germination boxes rather than using plastic flats like I do at the nursery. My hope is that these boxes will last for a few years (maybe many??) before needing to be repaired or discarded. I bought rough redwood 1x4s from our local Mill Valley Lumber, cut to varying lengths. Most of my boxes ended up being made with lengths 14"x23", but some are 12"x12". I'm not sure yet how I like the really long flat compared to a square flat. Instead of having wood bottoms I am testing out using hardware cloth for the base.
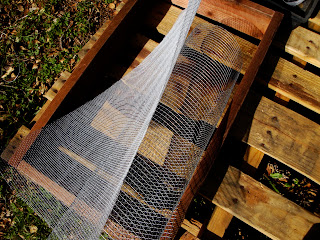
My thought was that the wood might rot out quickly with it being moist all the time and also having roots that would penetrate the wood surface, thereby degrading it faster. With the hardware cloth my hope is that it allows for easy drainage, yet is durable and easy to use. I don't know yet if my idea will get me in trouble more quickly down the line as the hardware cloth rusts or breaks down. I also have some boxes with a double layer of hardware cloth (the outer layer has 1 cm size square galvanized cloth while the inner layer is a much smaller weave) while some just have a single layer. My guess is that the single layer will break down and rust within the year.
But trial and error will allow me to decide if this really isn't the way to go and that I should probably stick with a wooden bottom like most people! So, I put the boxes together with outdoor wood screws and then stapled on the hardware cloth on the bottom. They seem to work out just fine for keeping the soil in the box, but I did notice that the long box is very heavy once the soil is wet, so the double layer seems to really help keep it from breaking apart.
Once the germination boxes are completed, it's time for the fun part of seed sowing! Since we are working on becoming certified organic, we must use organic materials. We bought Organic Blend Sunshine Mix from Harmony Farm Supply. In an ideal world we would be creating our own germination mix from the soil on our farm, but we have yet to create our own compost which will be necessary to maintain a more sustainable system of soil being renewable and enhanced rather than degraded. In the future the goal is to provide all the soil fertility we will need for both germinating seeds in flats as well as in the beds themselves. For now we have resigned to buying a seed germination mix. In case you are wondering, a seed germination mix is very light and fluffy and seedlings love to grow in it.
First, I need to make sure that the germination mix is clump free and moist (not too wet and not too dry - like a wrung out sponge).
You can de-clump the mix  by hand as it gets put into the box. The box gets filled to the brim with the mix and is then tamped down gently.
The seeds are then sprinkled by hand in an even manner, first one direction and then the other so that the seeds generally land in a grid pattern allowing maximum space between seeds.
You want to make sure that you are not oversowing seed (too much competition), while also not undersowing (you want to maximize the amount of seedlings you can fit in the flat for healthy growth). Then, the seeds are tamped to provide good contact with the soil.
 Next, you take a little bit of drier germination mix and use either hardware cloth or a sieve to shake more soil over the soil to cover the seeds. Depending on the size of seed will depend on how much soil is needed to cover them (smaller seeds need less soil, while bigger seeds need more). It then gets tamped one more time.
Lastly, you are ready to mist the soil down, label your flat with what you have (a very important detail, leeks and onions look exactly the same when they germinate) and place them in your "greenhouse" and watch them grow.
What's that you say? You don't have a greenhouse?!  Well, I have obviously taken up too much of your time with this post, so greenhouses and building your own will be discussed in another post.

But, you are ready to get your hands dirty and start sowing! Happy germinating!
Baby American Flag Leeks after 17 days (Australian Brown Onions in the box in the background). How cute! Peppers have yet to germinate in the pots.


Monday, February 20, 2012

seeds... seeds... and more seeds

It's that time of year that every gardener looks forward to. The time of year where one's eyes start to wander the seed catalogs, the seed websites, and dreams about all the vegetables and fruits one will be growing that year. It's the time for hope; hope that everything you have spent your hard earned money on will grow and multiply and be fruitful.

We've been on the hunt for the most interesting seeds that we can buy, but the only hitch is that we must find seed that is organic seed. You see, we are in the process of becoming a certified organic farm (more on this in the future). This presents itself with limitation on the seeds available to purchase by us from seed companies. Some organic seeds are everyday varieties that many people have heard of (who wants to grow Kentucky Wonder pole beans? Everyone and their great great grandpa has been growing it since 1864, which on the one hand makes it an heirloom and on the other makes it common place). But, we are after varieties that might be a bit more unusual (look out Turkey Craw and Mayflower beans!).

seeds from Horizon herbs: wild arugula, chilhuacle pepper, hopi yellow bean, hopi red lima bean, palla rosa chicory, chinese wild yam (couldn't help myself), Chadwick's cherry tomato, principe borghese tomato

We have been pouring over lots of great seed companies and seed saver websites. Maybe you might be interested in looking at them too for your own garden? Maybe those kids might want to grow something their classmates might never have heard of or would have ever imagined eating?
Here's a quick list of the places we have purchased from:
Seed Savers Exchange
Sustainable Seed Company 
Horizon Herbs
The Natural Gardening Company
Southern Exposure Seed Exchange
Bountiful Gardens
and for potatoes
The Main Potato Lady

seeds from Sustainable Seed Company: chiogga beet, american flag leek, hungarian black pepper, australian brown onion, and a free packet of speckles lettuce

In general, we found most of these organic seed websites and more from the CCOF website
organic seed resources

What we have learned though, is that there is a loop hole....
You must use organic seed if you are a certified organic farm, BUT if you cannot source a particular seed as organic and have records showing that you have searched for said organic seed, but can only find commercially available conventionally grown seed, then you are allowed to grow that seed. The other stipulation is that the seed must be non-gmo, and either untreated, or treated only with allowed substances.

With this in mind we have agreed to abide by this rule and only source organically grown seeds. This presents us with the challenge of a treasure hunt for these special, heirloom, rare, or unusual organically grown seeds. We have purchased a first round of seeds, but will be getting our next treasures within the week.


and here's a little sneak peak for the next post...

what does 22 feet of schedule 40 1/2" PVC,  3sided 1/2" PVC elbows and male adapter fittings create when it's all cut to length and fitted together?

tune in next time for a post about the art of seed sowing and building your own mini greenhouses.

Friday, February 3, 2012

Updates of the First Winter

Greetings Everyone,

We hope that the winter is going well. We are doing great! The farm is too...

Despite the fact that there is no "farming" to do right now, there are still projects to complete and observations to make.

PROJECTS:

First, we started cutting back the huge blackberry bush that is starting to invade the farm. It is well established (hasn't been pruned for about 5 years!), so we have a lot of work to do to completely remove it. The first step is to cut all of the canes and just leave them barely sticking out of the ground. Once we have completed this, we will come back through and dig out the roots. The problem is further complicated by the fact that the canes are growing around and through some large rosemary bushes. Getting access to the canes is a bit tricky... its a twisted game of Twister. "Twisted" because we have to navigate the thorny "spikes" that we left sticking out of the ground and because of the the dangling thorny canes that seemingly reach out and grab us.

First cut the canes. Then dig the roots. We are about 1/3 done.

We have also started to replace the fencing. The original fence was installed by Yeti over 15 years ago, and much of it is falling apart. The owner offered to buy the materials if we install it. Deal! While it is a challenge, it is something (somewhat) new for us. So far, we have completed about 3/4 of the fence. Our goal is to have it completely done by Spring... we hope.

We also have to start cleaning out and around the shed. Much of it is completely disheveled, so it needs a whole day of organizing and cleaning. We need a less-cluttered place to store our tools and an area to germinate our seeds for the coming year. But, all of the stuff in/around the shed is Yeti's, so we have to wait for him... He is busy pruning fruit trees this time of year, so this project will likely not get started for another month.

Gopher-ing and Mole-ing. Be glad that there are no pictures for this one. It's an ongoing communication with these guys to keep them out of the garden. We try to "tell" them that they can live and eat just outside the fence line, but coming inside poses a threat to both of us. Yeti says that, over the course of the first 3 years that he farmed here, he trapped more than 1,000 gophers!

OBSERVATIONS:

The results of our Seed Sowing - Moon Phase experiment are inconclusive at the moment. Neither of the plants, those sown according to the moon and those not, is growing too well. They're not doing poorly, it's just that we sowed them too late, it has been very cold for a prolonged period of time, and there has been little/no rain (until now!). Even so, we will continue to experiment with such phenomena as we continue to plant in the future.

It finally rained!

Finally, we want to thank all of you, one for actually reading this blarney, and two for continuing to encourage us. Also, we want to thank you for helping us get some tools and supplies that we need. Thanks to you, we have recently added goodies both big and small to our tool-chest: a wheel-barrow, a hoe, and a Farmer's Almanac, just to name a few. Shortly, we plan to equip our irrigation system. So, once again, thank you!

New Wheelbarrow. Putting it to good use already.

Snoozing in the sun...

There will be more pictures soon...


C + C